ProcessingのblendMode()の使い方
ProcessingではblendMode()で色を重ねたときにどう表示するかを決定するすることができます。 これを使うと発光表現を簡単に作ることができるらしいのですが、いまいち公式リファレンスを読んでも何がどうなるかがわからず敬遠していました。
なので今回はblendModeの設定だけを変えて同じものを描画し、色を重ねたときにどうなるかを検証してみました。
BLEND
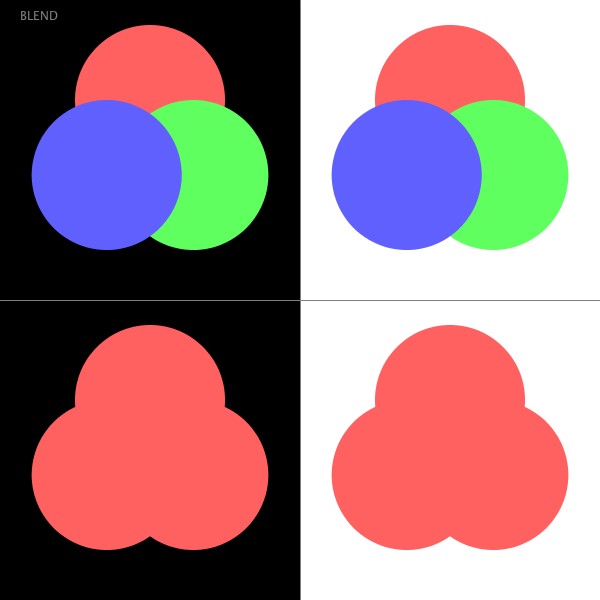
BLENDはデフォルトの設定です。 上段は3色を、下段は単色を重ねています。左側は背景が黒色、右側は背景が白色になっています。 そのため、全部で4つの設定を比較しています。 以下では、同じものをblendModeの設定だけ変えて描画しています。 BLENDの場合は、alpha値を設定しないと色を重ねても上書きされるだけです。
ADD
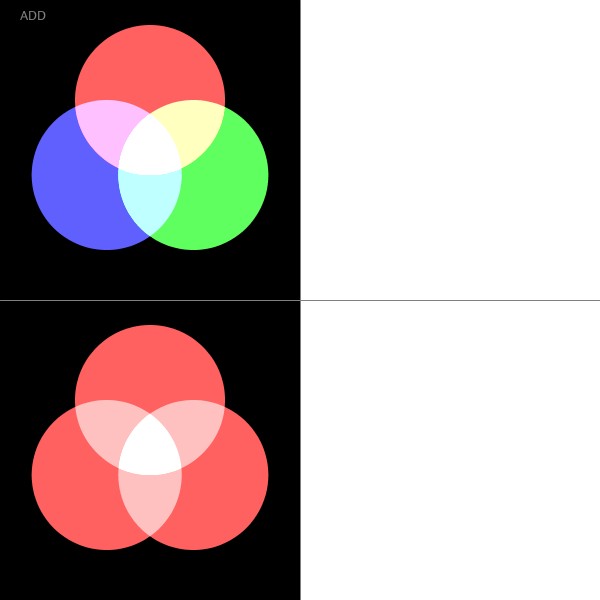
ADDでは、色を重ねるとどんどん白に近づいていきます。そのため、背景が白い場合は何も表示されません。ADDで色を重ねると発光表現になるみたいです。
SUBTRACT
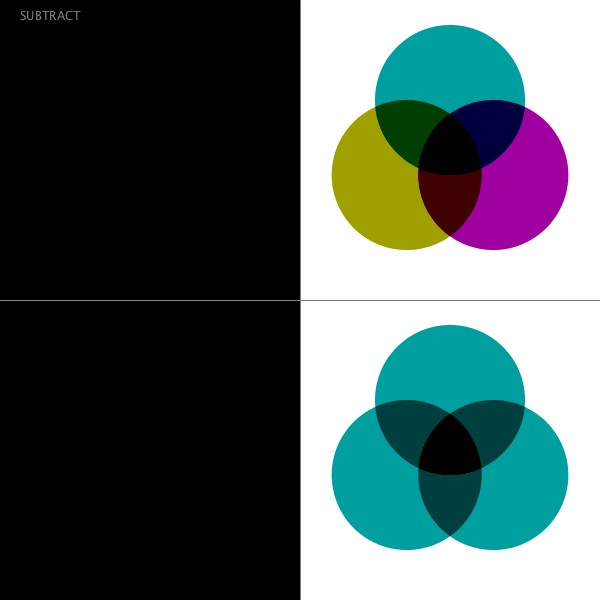
SUBTRACTはADDと逆で、白からどんどん色を抜いていき、黒に近づいていきます。白に色を重ねた場合、表示されるのがその補色なので使用するのが難しそうです。
DARKEST
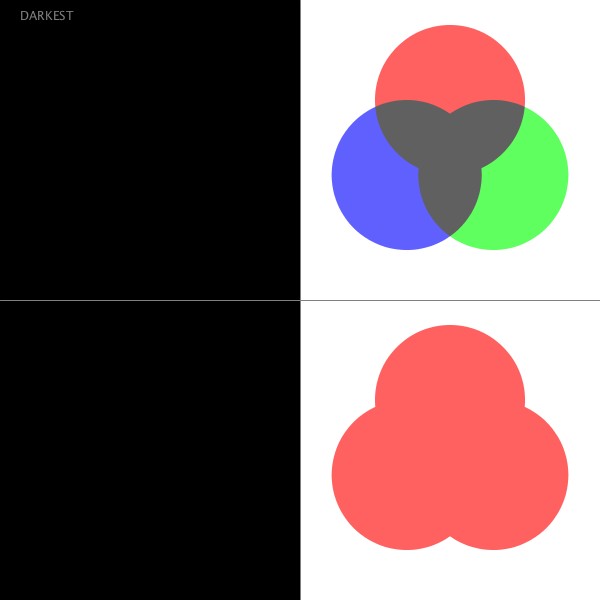
DARKESTは重ねたときに各RGB値の値が小さい方を新たなRGB値にして表示します。背景が黒の場合は(R, G, B) = (0, 0, 0)なので何も表示されません。
LIGHTEST
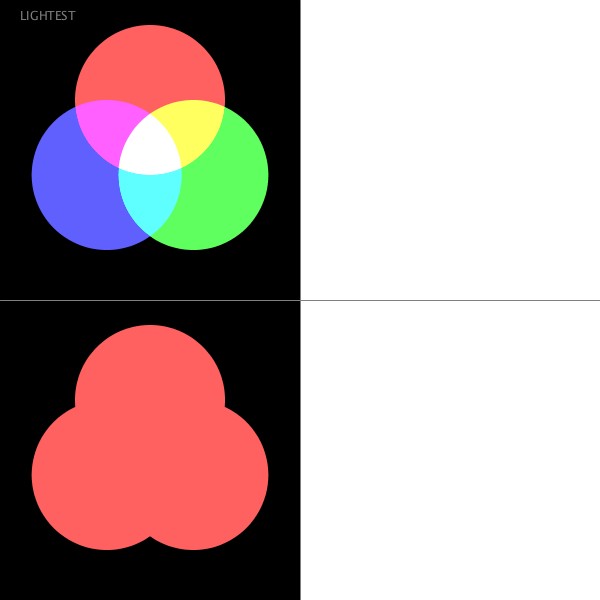
LIGHTESTはDARKESTと逆に、重ねたときに各RGB値の値が大きい方を新たなRGB値にして表示します。背景が白の場合は(R, G, B) = (255, 255, 255)なので何も表示されません。
DIFFERENCE
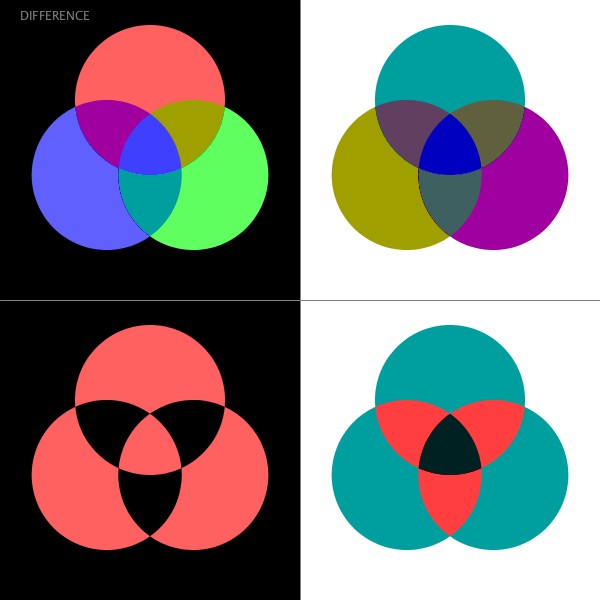
DIFFERENCEは背景色と重ねた色の差をもとに新たな色を決定しています。
EXCLUSION
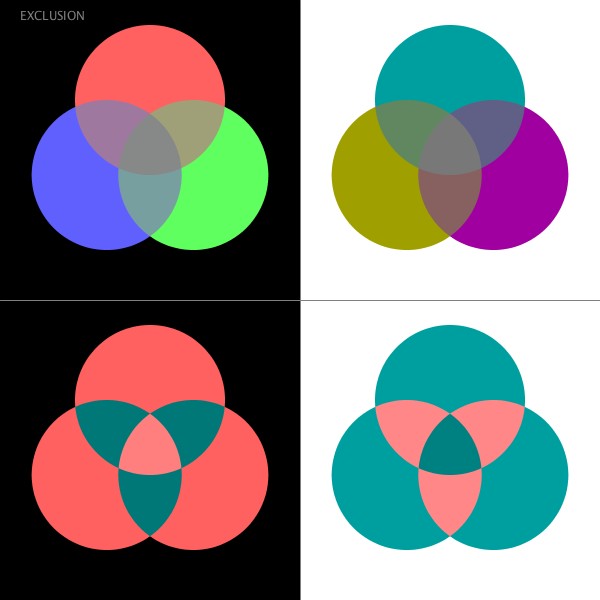
EXCLUSIONはDIFFERENCEと同じ処理をしていますが、その処理がやや抑えめになっています。
MULTIPLY
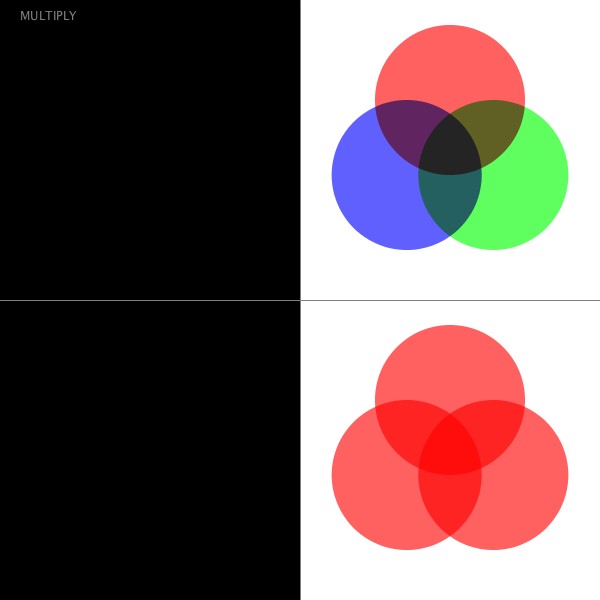
MULTIPLYでは重ねると色が暗くなります。
SCREEN
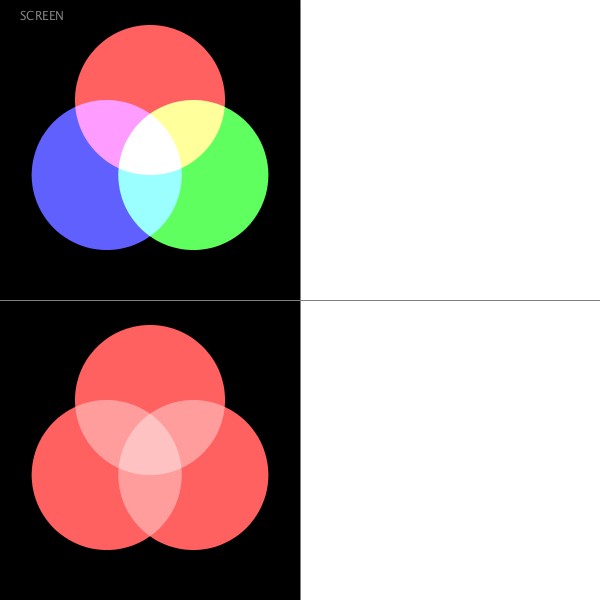
SCREENはMULTIPLYと逆で、重ねると色が明るくなります。これも発光表現に使えるようです。
まとめ
基本的には、ADDとSUBTRACT、LIGHTESTとDARKEST、SCREENとMULTIPLYがそれぞれ黒背景用、白背景用で対照になっているようです。 SUBTRACTとDARKESTは重ねた色の補色が表示されるので、感覚的に使うのは難しそうです。
ちなみにBLENDモードで重ねる色のalpha値を設定したとき(alpha = 150)は以下のようになります。
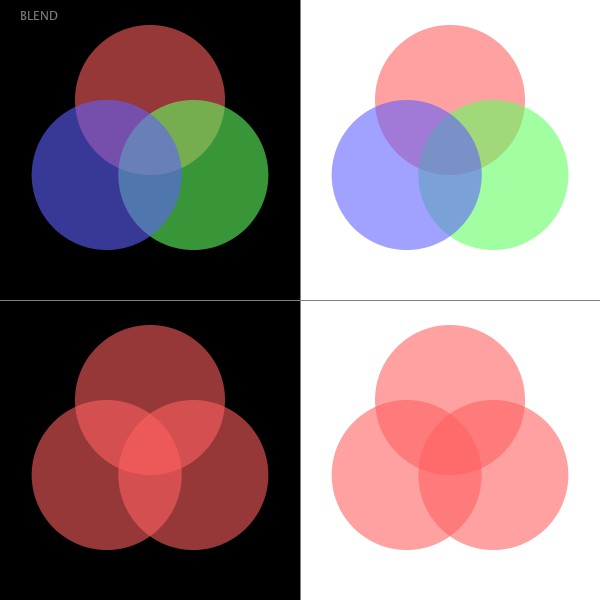
以下、コードです。マウスクリックでblendModeの設定を変更することができます。 Processing3で動作を確認しています。 Processing2ではblendModeがうまく機能しませんでした。
/**
* test for blendMode()
*
*/

int modeId = 0;
int[] modes = {BLEND, ADD, SUBTRACT, DARKEST, LIGHTEST, DIFFERENCE, EXCLUSION, MULTIPLY, SCREEN};
String[] modesStr = {"BLEND", "ADD", "SUBTRACT", "DARKEST", "LIGHTEST", "DIFFERENCE", "EXCLUSION", "MULTIPLY", "SCREEN"};

void setup(){
  size(600, 600);
}

void mousePressed(){
  modeId++;
  if(modeId == modes.length){
    modeId = 0;
  }
}

void draw(){
  blendMode(BLEND);
  background(255);
  noStroke();
  fill(0);
  rect(0, 0, width / 2, height);
  stroke(128);
  strokeWeight(1);
  line(0, height / 2, width, height / 2);
  line(width / 2, 0, width / 2, height);
  fill(128);
  text(modesStr[modeId], 20, 20);

  blendMode(modes[modeId]);
  pushMatrix();
  translate(width / 4, height /4);
  drawPolyCircles();
  popMatrix();
  pushMatrix();
  translate(width / 4 * 3, height /4);
  drawPolyCircles();
  popMatrix();
  pushMatrix();
  translate(width / 4, height /4 * 3);
  drawMonoCircles();
  popMatrix();
  pushMatrix();
  translate(width / 4 * 3, height /4 * 3);
  drawMonoCircles();
  popMatrix();
}

void drawPolyCircles(){
  color[] colors = {color(255, 96, 96),
                    color(96, 255, 96),
                    color(96, 96, 255)};
  noStroke();
  for(int i = 0; i < 3; i++){
    fill(colors[i]);
    pushMatrix();
    rotate(i * TWO_PI / 3 - HALF_PI);
    ellipse(50, 0, 150, 150);
    popMatrix();
  }
}

void drawMonoCircles(){
  noStroke();
  for(int i = 0; i < 3; i++){
    fill(color(255, 96, 96));
    pushMatrix();
    rotate(i * TWO_PI / 3 - HALF_PI);
    ellipse(50, 0, 150, 150);
    popMatrix();
  }
}
Minimの使い方
ここではProcessingで音を扱うためのライブラリであるMinimについて解説します。
スピーカーから音を鳴らす
まずはMinimの基本的な使い方を確認していきましょう。 次のコードはスピーカーから440Hzのサイン波を鳴らすものです。
/*
* sample01
*/

import ddf.minim.spi.*;
import ddf.minim.signals.*;
import ddf.minim.*;
import ddf.minim.analysis.*;
import ddf.minim.ugens.*;
import ddf.minim.effects.*;

Minim minim;
AudioOutput out;
Oscil oscil;

void setup(){
  size(512, 200);
  minim = new Minim(this);
  out = minim.getLineOut();
  oscil = new Oscil(440, 1.0, Waves.SINE);
  oscil.patch(out);
}

void draw(){
  background(0);
  stroke(255);
  for(int i = 0; i < out.bufferSize() - 1; i++){
    line(i, 50 + out.left.get(i) * 50, i + 1,  50 + out.left.get(i + 1) * 50);
    line(i, 150 + out.right.get(i) * 50, i + 1,  150 + out.right.get(i + 1) * 50);
  }
}
このコードを順に解説していきます。
import ddf.minim.spi.*;
import ddf.minim.signals.*;
import ddf.minim.*;
import ddf.minim.analysis.*;
import ddf.minim.ugens.*;
import ddf.minim.effects.*;
はじめにMinimのライブラリを読み込みます。 これはメニューの次のところを選択することで自動で入力されます。
「Sketch」->「Import Libary」->「minim」
Minim minim;
AudioOutput out;
Oscil oscil;
次に音を鳴らすために必要な変数を宣言します。 これらのクラスについては後ほど説明します。
void setup(){
  size(512, 200);
  minim = new Minim(this);
  out = minim.getLineOut();
  oscil = new Oscil(440, 1.0, Waves.SINE);
  oscil.patch(out);
}
setup関数ではまず、Minimクラスのインスタンスを作成します。 これはMinimを使う場合には必ず作成します。 AudioOutputはMinimで音を出力するために作成します。 Oscilは、サイン波や三角波、矩形波などの波を作成するためのインスタンスです。 第1引数が周波数、第2引数が振幅(音量)、第3引数が波の種類です。 このOscilをAudioOutputにパッチして(繋げて)います。 これにより波を音としてスピーカーから出力できます。 このパッチングがMinimでいろいろな音を鳴らす上での肝となります。 引数を変更すると音程や音量が変化するのがわかると思います。
Oscilで作成できる波の種類には以下のものがあります。
- Waves.SINE: サイン波
- Waves.TRIANGLE: 三角波
- Waves.SAW: ノコギリ波
- Waves.SQUARE: 矩形波
- Waves.QUATERPULSE
- Waves.PHASOR
void draw(){
  background(0);
  stroke(255);
  for(int i = 0; i < out.bufferSize() - 1; i++){
    line(i, 50 + out.left.get(i) * 50, i + 1,  50 + out.left.get(i + 1) * 50);
    line(i, 150 + out.right.get(i) * 50, i + 1,  150 + out.right.get(i + 1) * 50);
  }
}
draw関数内では、出力している音の波形をステレオの左右ごとに描画しています。
ファイルから音を再生する
今度は、ローカルにあるサウンドファイルをMinimを用いてProcessing上で鳴らしてみましょう。 次のコードでは、マウスクリックでサウンドファイルを頭から再生します。 サウンドファイルはソースファイルと同じディレクトリに置いてください。
/*
* sample02
*/

import ddf.minim.spi.*;
import ddf.minim.signals.*;
import ddf.minim.*;
import ddf.minim.analysis.*;
import ddf.minim.ugens.*;
import ddf.minim.effects.*;

Minim minim;
AudioPlayer player;

void setup(){
  size(512, 200);
  minim = new Minim(this);
  player = minim.loadFile("sound.mp3");
}

void mousePressed(){
  player.rewind();
  player.play();
}

void draw(){
  background(0);
  stroke(255);
  for(int i = 0; i < player.bufferSize() - 1; i++){
      float x1 = map(i, 0, player.bufferSize(), 0, width);
      float x2 = map(i + 1, 0, player.bufferSize(), 0, width);
      line(x1, 50 + player.left.get(i) * 50, x2, 50 + player.left.get(i + 1)*50);
      line(x1, 150 + player.right.get(i) * 50, x2, 150 + player.right.get(i + 1)*50);
  }
}
ファイルを再生するには、AudioPlayerインスタスンスをminim.loadFile()により作成します。 mousePressed関数内では、はじめにrewind()でサウンドファイルの頭に再生位置を移動させ、play()で再生を始めます。 AudioPlayerでは、同じファイルを何度も再生するにはrewind()でサウンドファイルを巻き戻す必要があります。
マイクから入力した音をスピーカーから出力する
PCについているマイクから音を入力して、それをそのままスピーカーから鳴らすコードです。
/*
* sample03
*/

import ddf.minim.spi.*;
import ddf.minim.signals.*;
import ddf.minim.*;
import ddf.minim.analysis.*;
import ddf.minim.ugens.*;
import ddf.minim.effects.*;

Minim minim;
AudioOutput out;
LiveInput in;

void setup(){
  size(512, 200);
  minim = new Minim(this);
  out = minim.getLineOut();
  AudioStream inputStream = minim.getInputStream(
                            out.getFormat().getChannels(),
                            out.bufferSize(),
                            out.sampleRate(),
                            out.getFormat().getSampleSizeInBits());
  in = new LiveInput(inputStream);
  in.patch(out);
}

void draw(){
  background(0);
  stroke(255);
  strokeWeight(1);
  for(int i = 0; i < out.bufferSize() - 1; i++){
    line(i, 50 + out.left.get(i) * 50, i + 1, 50 + out.left.get(i + 1) * 50);
    line(i, 150 + out.right.get(i) * 50, i + 1, 150 + out.right.get(i + 1) * 50);
  }
}
マイクから音を入力するには、LiveInputクラスを使います。 LiveInputを先述したAudioOutput型変数に直接パッチすることで出力しています。 PCのスピーカーから音をそのまま出力するとハウリングする可能性があるので、その場合はイヤフォンを使うなどしてください。 LiveInputとAudioOutの間に音を加工する処理を入れるとエフェクターになります。 MinimにはLiveInputの他にAudioInputという音を入力するためのクラスがありますが、LiveInputのほうが入力した音を加工することが簡単にできます。
Instrumentインターフェースを使う
最後にInstrumentインターフェースの使い方を説明します。 Instrumentインターフェースを使うことで音を鳴らす一連の処理をまとめることができます。 以下のコードでは、マウスクリックに応じてドレミを鳴らします。
/*
* sample04
*/

import ddf.minim.spi.*;
import ddf.minim.signals.*;
import ddf.minim.*;
import ddf.minim.analysis.*;
import ddf.minim.ugens.*;
import ddf.minim.effects.*;

Minim minim;
AudioOutput out;

void setup(){
  size(512, 200);
  minim = new Minim(this);
  out = minim.getLineOut();
}

void mousePressed(){
  out.playNote(0.0, 0.5, new MyInstrument(Frequency.ofPitch("C4").asHz(), 0.5));
  out.playNote(0.5, 1.0, new MyInstrument(Frequency.ofPitch("D4").asHz(), 0.75));
  out.playNote(1.5, 1.5, new MyInstrument(Frequency.ofPitch("E4").asHz(), 1.0));
}

void draw(){
  background(0);
  stroke(255);
  strokeWeight(1);
  for(int i = 0; i < out.bufferSize() - 1; i++){
    line(i, 50 + out.left.get(i) * 50, i + 1, 50 + out.left.get(i + 1) * 50);
    line(i, 150 + out.right.get(i) * 50, i + 1, 150 + out.right.get(i + 1) * 50);
  }
}

class MyInstrument implements Instrument{
  Oscil oscil;
  MyInstrument(float frequency, float amplitude){
    oscil = new Oscil(frequency, amplitude, Waves.SINE);
  }

  void noteOn(float duration){
    oscil.patch(out);
  }

  void noteOff(){
    oscil.unpatch(out);
  }
}
Instrumentインターフェースはimplementsで自作クラスに継承します。 自作クラスにはnoteOn関数とnoteOff関数を作成する必要があります。 noteOn関数は音を鳴らし始めるときに行うパッチングなどの処理を書きます。 noteOff関数は音を鳴らし終えるときに行うパッチを外す処理などを書きます。 このように作成したクラスはplayNoteメソッドに引数として渡します。 playNoteメソッドの第1引数はnoteOnを始めるまでの時間(秒)、第2引数はnoteOnを始めてからnoteOffで終わるまでの時間(秒)です。 第2引数はnoteOn関数に渡される引数(duration)になります。
この記事はProcessingで楽器を作ろうの第1回目です。
[参考]
Processingで楽器を作ろう
最近、ProcessingのMinimとControlP5で楽器を作っています。
サウンド カテゴリーの記事一覧 - 30 min. Processing
このノウハウを折角なので、まとめていきたいと思います。
MinimはProcessingで音を扱うためのライブラリです。Minimを使うことで、ファイルから音を読み出して再生したり、音を合成して鳴らすことができます。
ControlP5はProcessingでGUIを作成するためのライブラリです。通常、Processingで入力となるのはマウス位置やクリック、キーボードくらいです。しかし、それだけだと複雑な楽器のパラメータを扱うには貧弱すぎます。ControlP5で作成したGUIからパラメータを操作できるようにすると楽器の操作性を上げることができます。
以下が内容の予定です。MinimとControlP5の基本的な使い方から初めて、最終的にはリズムマシンやシンセサイザーを作りたいと思います。
- 【第1回】Minimの使い方
- 【第2回】ControlP5の使い方
- 【第3回】Processingでキーボードを鍵盤にする
- 【第4回】Processingでサンプラーをつくる
- 【第5回】Processingでエフェクターをつくる
- 【第6回】Processingでリズムマシンをつくる
- 【第7回】Processingでシンセサイザーをつくる
動作はProcessing2で確認していきますが、たぶんProcessing3でも動くと思います。
ProcessingでパラメータをGUIで操作できるBoids
ProcessingでパラメータをGUIで操作できるBoidsを作成しました。Boidsはパラメータが多数あるので、これでパラメータの影響がわかりやすくなると思います。
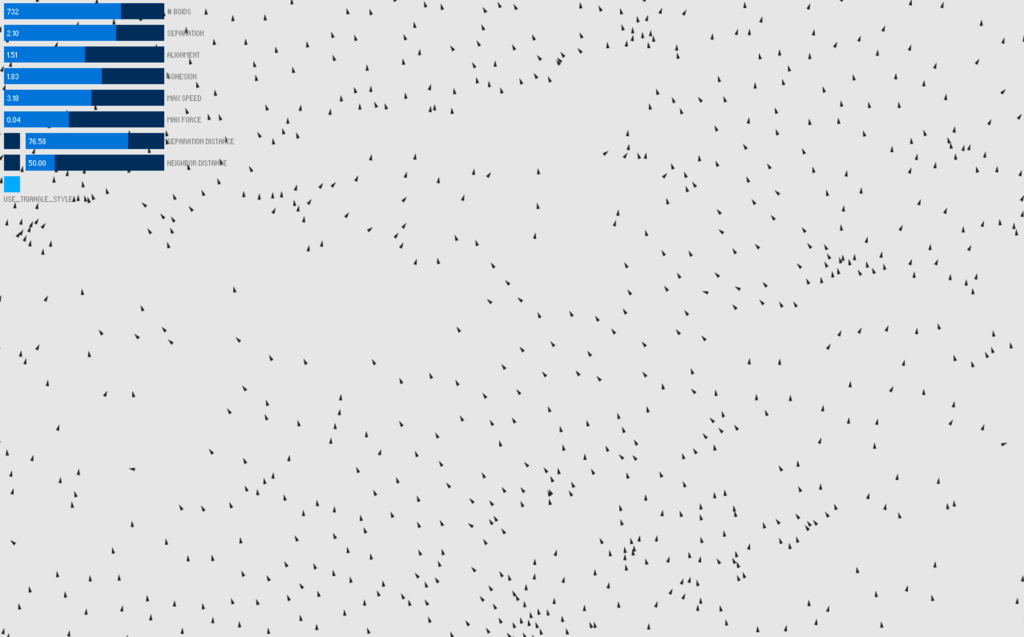
Boids自体は、前に作成した3D版と同じようにProcessingのSampleにあるFlockingを参考にしています。 GUIはControlP5を用いています。
Processingで3DのBoids - aa develop
操作可能なパラメータは以下のとおりです。
- # BOIDS:Boidの数
- SEPARATION:Separation(引き離し)の重み、値が大きいほど影響が大きい
- ALIGNMENT:Alignment(整列)の重み、値が大きいほど影響が大きい
- COHESION:Cohesion(結合)の重み、値が大きいほど影響が大きい
- MAX SPEED:Boidの最大速度
- MAX FORCE:Separation、Alignment、Cohesionで与える最大の力
- SEPARATION_DISTANCE:Separationの影響を受ける他のBoidsとの最大距離、Toggleボタンで範囲を可視化
- NEIGHBOR_DISTANCE:Alignment、Cohesionの影響を受ける他のBoidsとの最大距離、Toggleボタンで範囲を可視化
- USE_TRIANGLE_STYLE:Boidsを三角形で表示する or 点で表示する
Processig3での動作を確認しました。Processing2では、fullScreen()をsize()に変更すれば動くと思います。
以下、コード。
Boids_with_GUI.pde
import controlP5.*;

ControlP5 cp5;
Flock flock;

int NUM_BOIDS;
float SEPARATION_WEIGHT;
float ALIGNMENT_WEIGHT;
float COHESION_WEIGHT;
float MAX_SPEED;
float MAX_FORCE;
float NEIGHBOR_DISTANCE;
float SEPARATION_DISTANCE;
boolean SHOW_NEIGHBOR_DISTANCE;
boolean SHOW_SEPARATION_DISTANCE;
boolean USE_TRIANGLE_STYLE;

void setup() {
  fullScreen();
  //size(800, 600);

  cp5 = new ControlP5(this);
  cp5.setColorCaptionLabel(color(128));
  int guiHeight = 20;
  int guiMargin = 7;
  int guiNum = 0;
  cp5.addSlider("NUM_BOIDS")
     .setLabel("# BOIDS")
     .setPosition(guiMargin, (guiMargin + guiHeight) * (guiNum++) + guiMargin)
     .setSize(200, guiHeight)
     .setValue(150)
     .setRange(10, 1000);

  cp5.addSlider("SEPARATION_WEIGHT")
     .setLabel("SEPARATION")
     .setPosition(guiMargin, (guiHeight + guiMargin) * (guiNum++) + guiMargin)
     .setSize(200, guiHeight)
     .setValue(1.5)
     .setRange(0, 3.0);

  cp5.addSlider("ALIGNMENT_WEIGHT")
     .setLabel("ALIGNMENT")
     .setPosition(guiMargin, (guiHeight + guiMargin) * (guiNum++) + guiMargin)
     .setSize(200, guiHeight)
     .setValue(1.0)
     .setRange(0.0, 3.0);

  cp5.addSlider("COHESION_WEIGHT")
     .setLabel("COHESION")
     .setPosition(guiMargin, (guiHeight + guiMargin) * (guiNum++) + guiMargin)
     .setSize(200, guiHeight)
     .setValue(1.0)
     .setRange(0, 3.0);

  cp5.addSlider("MAX_SPEED")
     .setLabel("MAX SPEED")
     .setPosition(guiMargin, (guiHeight + guiMargin) * (guiNum++) + guiMargin)
     .setSize(200, guiHeight)
     .setValue(2.0)
     .setRange(1.0, 5.0);

  cp5.addSlider("MAX_FORCE")
   .setLabel("MAX FORCE")
   .setPosition(guiMargin, (guiHeight + guiMargin) * (guiNum++) + guiMargin)
   .setSize(200, guiHeight)
   .setValue(0.03)
   .setRange(0.01, 0.10);

  cp5.addToggle("SHOW_SEPARATION_DISTANCE")
     .setLabel("")
     .setPosition(guiMargin, (guiHeight + guiMargin) * guiNum + guiMargin)
     .setSize(20, guiHeight)
     .setValue(false);

  cp5.addSlider("SEPARATION_DISTANCE")
     .setLabel("SEPARATION DISTANCE")
     .setPosition(20 + guiMargin * 2, (guiHeight + guiMargin) * (guiNum++) + guiMargin)
     .setSize(200 - (20 + guiMargin), guiHeight)
     .setValue(25.0)
     .setRange(10.0, 100.0);

  cp5.addToggle("SHOW_NEIGHBOR_DISTANCE")
     .setLabel("")
     .setPosition(guiMargin, (guiHeight + guiMargin) * guiNum + guiMargin)
     .setSize(20, guiHeight)
     .setValue(false);

  cp5.addSlider("NEIGHBOR_DISTANCE")
     .setLabel("NEIGHBOR DISTANCE")
     .setPosition(20 + guiMargin * 2, (guiHeight + guiMargin) * (guiNum++) + guiMargin)
     .setSize(200 - (20 + guiMargin), guiHeight)
     .setValue(50.0)
     .setRange(10.0, 200.0);

  cp5.addToggle("USE_TRIANGLE_STYLE")
     .setLabel("USE_TRIANGLE_STYLE")
     .setPosition(guiMargin, (guiHeight + guiMargin) * (guiNum++) + guiMargin)
     .setSize(20, guiHeight)
     .setValue(true);

  flock = new Flock();
  // Add an initial set of boids into the system
  for (int i = 0; i < NUM_BOIDS; i++) {
    flock.addBoid(new Boid(width/2,height/2));
  }
}

void draw() {
  background(USE_TRIANGLE_STYLE ? 230: 30);
  flock.run();
  while(flock.size() != NUM_BOIDS){
    if(flock.size() < NUM_BOIDS){
      flock.addBoid(new Boid(width/2,height/2));
    } else {
      flock.removeBoid();
    }
  }
}
Boid.pde
// The Boid class

class Boid {

  PVector location;
  PVector velocity;
  PVector acceleration;
  float r;

    Boid(float x, float y) {
    acceleration = new PVector(0, 0);

    // This is a new PVector method not yet implemented in JS
    // velocity = PVector.random2D();

    // Leaving the code temporarily this way so that this example runs in JS
    float angle = random(TWO_PI);
    velocity = new PVector(cos(angle), sin(angle));

    location = new PVector(x, y);
    r = 2.0;
  }

  void run(ArrayList<Boid> boids) {
    flock(boids);
    update();
    borders();
    render();
  }

  void applyForce(PVector force) {
    // We could add mass here if we want A = F / M
    acceleration.add(force);
  }

  // We accumulate a new acceleration each time based on three rules
  void flock(ArrayList<Boid> boids) {
    PVector sep = separate(boids);   // Separation
    PVector ali = align(boids);      // Alignment
    PVector coh = cohesion(boids);   // Cohesion
    // Arbitrarily weight these forces
    sep.mult(SEPARATION_WEIGHT);
    ali.mult(ALIGNMENT_WEIGHT);
    coh.mult(COHESION_WEIGHT);
    // Add the force vectors to acceleration
    applyForce(sep);
    applyForce(ali);
    applyForce(coh);
  }

  // Method to update location
  void update() {
    // Update velocity
    velocity.add(acceleration);
    // Limit speed
    velocity.limit(MAX_SPEED);
    location.add(velocity);
    // Reset accelertion to 0 each cycle
    acceleration.mult(0);
  }

  // A method that calculates and applies a steering force towards a target
  // STEER = DESIRED MINUS VELOCITY
  PVector seek(PVector target) {
    PVector desired = PVector.sub(target, location);  // A vector pointing from the location to the target
    // Scale to maximum speed
    desired.normalize();
    desired.mult(MAX_SPEED);

    // Above two lines of code below could be condensed with new PVector setMag() method
    // Not using this method until Processing.js catches up
    // desired.setMag(MAX_SPEED);

    // Steering = Desired minus Velocity
    PVector steer = PVector.sub(desired, velocity);
    steer.limit(MAX_FORCE);  // Limit to maximum steering force
    return steer;
  }

  void render() {
    // Draw a triangle rotated in the direction of velocity
    float theta = velocity.heading2D() + radians(90);
    // heading2D() above is now heading() but leaving old syntax until Processing.js catches up

    if(SHOW_NEIGHBOR_DISTANCE){
      noFill();
      stroke(255, 105, 180, 60);
      ellipse(location.x, location.y, NEIGHBOR_DISTANCE * 2, NEIGHBOR_DISTANCE * 2);
    }

    if(SHOW_SEPARATION_DISTANCE){
      noFill();
      stroke(0, 206, 209, 60);
      ellipse(location.x, location.y, SEPARATION_DISTANCE * 2, SEPARATION_DISTANCE * 2);
    }
    if(USE_TRIANGLE_STYLE){
      fill(30);
      noStroke();
      pushMatrix();
      translate(location.x, location.y);
      rotate(theta);
      beginShape(TRIANGLES);
      vertex(0, -r*2);
      vertex(-r, r*2);
      vertex(r, r*2);
      endShape();
      popMatrix();
    } else {
      stroke(230);
      point(location.x, location.y);
    }
  }

  // Wraparound
  void borders() {
    if (location.x < -r) location.x = width+r;
    if (location.y < -r) location.y = height+r;
    if (location.x > width+r) location.x = -r;
    if (location.y > height+r) location.y = -r;
  }

  // Separation
  // Method checks for nearby boids and steers away
  PVector separate (ArrayList<Boid> boids) {
    PVector steer = new PVector(0, 0, 0);
    int count = 0;
    // For every boid in the system, check if it's too close
    for (Boid other : boids) {
      float d = PVector.dist(location, other.location);
      // If the distance is greater than 0 and less than an arbitrary amount (0 when you are yourself)
      if ((d > 0) && (d < SEPARATION_DISTANCE)) {
        // Calculate vector pointing away from neighbor
        PVector diff = PVector.sub(location, other.location);
        diff.normalize();
        diff.div(d);        // Weight by distance
        steer.add(diff);
        count++;            // Keep track of how many
      }
    }
    // Average -- divide by how many
    if (count > 0) {
      steer.div((float)count);
    }

    // As long as the vector is greater than 0
    if (steer.mag() > 0) {
      // First two lines of code below could be condensed with new PVector setMag() method
      // Not using this method until Processing.js catches up
      // steer.setMag(MAX_SPEED);

      // Implement Reynolds: Steering = Desired - Velocity
      steer.normalize();
      steer.mult(MAX_SPEED);
      steer.sub(velocity);
      steer.limit(MAX_FORCE);
    }
    return steer;
  }

  // Alignment
  // For every nearby boid in the system, calculate the average velocity
  PVector align (ArrayList<Boid> boids) {
    PVector sum = new PVector(0, 0);
    int count = 0;
    for (Boid other : boids) {
      float d = PVector.dist(location, other.location);
      if ((d > 0) && (d < NEIGHBOR_DISTANCE)) {
        sum.add(other.velocity);
        count++;
      }
    }
    if (count > 0) {
      sum.div((float)count);
      // First two lines of code below could be condensed with new PVector setMag() method
      // Not using this method until Processing.js catches up
      // sum.setMag(MAX_SPEED);

      // Implement Reynolds: Steering = Desired - Velocity
      sum.normalize();
      sum.mult(MAX_SPEED);
      PVector steer = PVector.sub(sum, velocity);
      steer.limit(MAX_FORCE);
      return steer;
    }
    else {
      return new PVector(0, 0);
    }
  }

  // Cohesion
  // For the average location (i.e. center) of all nearby boids, calculate steering vector towards that location
  PVector cohesion (ArrayList<Boid> boids) {
    PVector sum = new PVector(0, 0);   // Start with empty vector to accumulate all locations
    int count = 0;
    for (Boid other : boids) {
      float d = PVector.dist(location, other.location);
      if ((d > 0) && (d < NEIGHBOR_DISTANCE)) {
        sum.add(other.location); // Add location
        count++;
      }
    }
    if (count > 0) {
      sum.div(count);
      return seek(sum);  // Steer towards the location
    }
    else {
      return new PVector(0, 0);
    }
  }
}
Flock.pde
// The Flock (a list of Boid objects)

class Flock {
  ArrayList<Boid> boids; // An ArrayList for all the boids

  Flock() {
    boids = new ArrayList<Boid>(); // Initialize the ArrayList
  }

  void run() {
    for (Boid b : boids) {
      b.run(boids);  // Passing the entire list of boids to each boid individually
    }
  }

  void addBoid(Boid b) {
    boids.add(b);
  }

  void removeBoid(){
    boids.remove(0);
  }

  int size(){
    return boids.size();
  }

}
Processingで3DのBoids
Processingで3DのBoidsを作成しました。群れをつくって3D空間を飛んでいます。
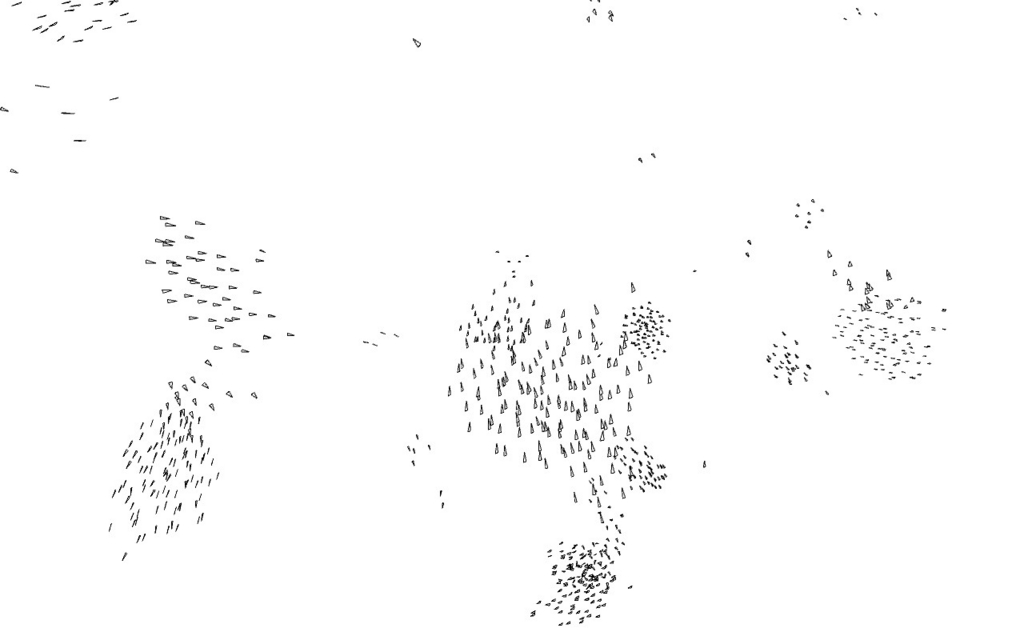
基本的にはProcessingのSampleにある「Topics/Simulate/Flocking」を3Dになるように書き換えただけです。 このSampleは「The Nature of Code」の「6. AUTONOMOUS AGENTS」で解説されています。
Processing3で動作確認済みです。Processing2ではfullScreen()を使えないので、size()を使ってください。
OpenProcessingにも上げておいたので、ブラウザでも見ることができます。
Boidsはパラメータで挙動がいろいろ変わると思うので、次はGUIでパラメータを操作できるようにしたいと思います。
以下、コード。
Boids_3D.pde
Flock flock;

void setup(){
  fullScreen(P3D);
  //size(640, 640, P3D);
  flock = new Flock();
  for(int i = 0; i < 500; i++){
    flock.addBoid(new Boid(0 , 0, 0));
  }
}

void draw(){
  background(255);
  stroke(30);
  fill(255);
  translate(width / 2, height / 2);
  rotateX(map(mouseY, 0, height, -HALF_PI, HALF_PI));
  rotateY(map(mouseX, 0, width, -HALF_PI, HALF_PI));
  stroke(0);
  flock.run();
}
Boid.pde
class Boid{
  PVector location;
  PVector velocity;
  PVector acceleration;
  float r;
  float maxforce;
  float maxspeed;

  Boid(float x, float y, float z){
    acceleration = new PVector(0, 0, 0);
    float angle1 = random(PI);
    float angle2 = random(TWO_PI);
    velocity = new PVector(sin(angle1) * cos(angle2), sin(angle1) * sin(angle2), cos(angle1));
    location = new PVector(x, y, z);
    r = 2.0;
    maxspeed = 2;
    maxforce = 0.03;
  }

  void run(ArrayList<Boid> boids){
    flock(boids);
    update();
    borders();
    render();
  }

  void applyForce(PVector force){
    acceleration.add(force);
  }

  void flock(ArrayList<Boid> boids){
    PVector sep = separate(boids);
    PVector ali = align(boids);
    PVector coh = cohesion(boids);
    sep.mult(1.5);
    ali.mult(1.0);
    coh.mult(1.0);
    applyForce(sep);
    applyForce(ali);
    applyForce(coh);
  }

  void update(){
    velocity.add(acceleration);
    velocity.limit(maxspeed);
    location.add(velocity);
    acceleration.mult(0);
  }

  PVector seek(PVector target){
    PVector desired = PVector.sub(target, location);
    desired.normalize();
    desired.mult(maxspeed);
    PVector steer = PVector.sub(desired, velocity);
    steer.limit(maxforce);
    return steer;
  }

  void render(){
    pushMatrix();
    translate(location.x, location.y, location.z);
    rotateZ(atan2(velocity.y, velocity.x) + HALF_PI);
    rotateY(atan2(velocity.x, velocity.z) + HALF_PI);
    beginShape(TRIANGLES);
    vertex(0, -r * 2, 0);
    vertex(-r, r * 2, 0);
    vertex(r, r * 2, 0);
    endShape();
    popMatrix();
  }

  void borders(){
    if(location.x > width / 2) location.x = -width / 2;
    if(location.y > height / 2) location.y = -height / 2;
    if(location.z > height / 2) location.z = -height / 2;
    if(location.x < -width / 2) location.x = width / 2;
    if(location.y < -height / 2) location.y = height / 2;
    if(location.z < -height / 2) location.z = height / 2;
  }

  PVector separate(ArrayList<Boid> boids){
    float desiredseparation = 25.0;
    PVector steer = new PVector(0, 0, 0);
    int count = 0;
    for(Boid other: boids){
      float d = PVector.dist(location, other.location);
      if((d > 0) && (d < desiredseparation)){
        PVector diff = PVector.sub(location, other.location);
        diff.normalize();
        diff.div(d);
        steer.add(diff);
        count++;
      }
    }
    if(count > 0){
      steer.div((float)count);
    }

    if(steer.mag() > 0){
      steer.normalize();
      steer.mult(maxspeed);
      steer.sub(velocity);
      steer.limit(maxforce);
    }
    return steer;
  }

  PVector align(ArrayList<Boid> boids){
    float neighbordist = 50;
    PVector sum = new PVector(0, 0, 0);
    int count = 0;
    for(Boid other: boids){
      float d = PVector.dist(location, other.location);
      if((d > 0) && (d < neighbordist)){
        sum.add(other.velocity);
        count++;
      }
    }
    if(count > 0){
      sum.div((float)count);
      sum.normalize();
      sum.mult(maxspeed);
      PVector steer = PVector.sub(sum, velocity);
      steer.limit(maxforce);
      return steer;
    } else {
      return new PVector(0, 0, 0);
    }
  }

  PVector cohesion(ArrayList<Boid> boids){
    float neighbordist = 50;
    PVector sum = new PVector(0, 0, 0);
    int count = 0;
    for(Boid other: boids){
      float d = PVector.dist(location, other.location);
      if((d > 0) && (d < neighbordist)){
        sum.add(other.location);
        count++;
      }
    }
    if(count > 0){
      sum.div(count);
      return seek(sum);
    } else{
      return new PVector(0, 0, 0);
    }
  }
}
Flock.pde
class Flock{
  ArrayList<Boid> boids;

  Flock(){
    boids = new ArrayList<Boid>();
  }

  void run(){
    for(Boid b: boids){
      b.run(boids);
    }
  }

  void addBoid(Boid b){
    boids.add(b);
  }
}
ProcessingのlerpColor()でグラデーションを作る
OpenProcessingでlerpColor()という便利な関数を教えてもらったので、メモ代わりにまとめておきます。
lerpColor()は簡単に言うと、lerp()というある2つの値の間を0.0〜1.0の比率で指定して取得することができる関数の色版みたいなもの。
例えば、横方向に変化するグラデーションを作るには、以下のように書く。
color c1, c2;
for(float w = 0; w < width; w += 5){
    color c = lerpColor(c1, c2, w / width);
    fill(c);
    rect(w, 0, 5, height);
}
これを、lerpColor()を使わずに書くとこうなり、RGBを分割してそれぞれ計算しなければならないため、若干めんどくさい。
color c1, c2;
for(float w = 0; w < width; w += 5){
 float r = map(w, 0, width, red(c1), red(c2));
 float g = map(w, 0, width, green(c1), green(c2));
 float b = map(w, 0, width, blue(c1), blue(c2));
    fill(r, g, b);
    rect(w, 0, 5, height);
}
以下、lerpColor()を使って、いくつかのグラデーションをつくってみた。
左から右へのグラデーション

void setup(){
  size(500, 500);
  noStroke();
  color c1 = color(255, 140, 0);
  color c2 = color(0, 255, 255);
  for(float w = 0; w < width; w += 5){
      color c = lerpColor(c1, c2, w / width);
      fill(c);
      rect(w, 0, 5, height);
  }
}
左上から右下へのグラデーション

void setup(){
  size(500, 500);
  noStroke();
  color c1 = color(255, 140, 0);
  color c2 = color(0, 255, 255);
  for(float w = 0; w < width; w += 5){
    for(float h = 0; h < height; h += 5){
      color c = lerpColor(c1, c2, (w + h) / (width + height));
      fill(c);
      rect(w, h, 5, 5);
    }
  }
}
円状のグラデーション

void setup(){
  size(500, 500);
  background(255);
  noStroke();
  color c1 = color(255, 140, 0);
  color c2 = color(0, 255, 255);
  for(float d = 400; d > 0; d -= 5){
    color c = lerpColor(c1, c2, d / 400.0);
    fill(c);
    ellipse(width / 2, height / 2, d, d);
  }
}
lerpColor()のリファレンスはこちら。